¶ 别人的博客
¶ 技巧
- 在enumerate中的item后换行用
\par,这样与正文之间会有一条缝隙。

如果使用\\换行则标题与正文之间没有缝隙,很难看

¶ 公式
\usepackage{amsmath}¶ 符号
https://en.wikibooks.org/wiki/LaTeX/Mathematics
¶ 数学
| 名字 | 符号 | 代码 | 备注 |
|---|---|---|---|
| 并且 | \wedge | ||
| 或者 | \vee | ||
| 并 | \cup | Latex——交集、并集 | |
| 交 | \cap | Latex——交集、并集 | |
| 包含于 | \subseteq | ||
| 积分 | \int | latex如何输入积分号 | |
| 微分 | \mathrm{d}x | 更规范的方法:LaTeX技巧898:在LaTeX中使用微分算子的正确姿势 | |
| 定积分竖线 | x^2 |_0^1 或者 x^2 |_0^1 | 如何在 LaTeX 中打出长竖线? - 知乎 | |
| 无穷 | \infty | latex无穷大 | |
| 组合数 | \binom{n}{m} 或者 C_n^m | LaTex排版技巧:[11]如何输入组合数? | |
| 约等号 | \approx | Latex 约等于 | |
| argmax | \mathop{\arg\max}\limits_{a, b} |
LaTeX中argmin / argmax下标书写方法 | |
| 因为 | \because |
如何用LaTeX打出"因为"-∵、"所以"∴? | |
| 所以 | \therefore |
如何用LaTeX打出"因为"-∵、"所以"∴? | |
| 数学期望 | \mathbb{E} |
Blackboard bold | |
| 正态分布 | \mathcal{N} |
\mathcal是Latex用来写花体字(calligraphic)的内置指令 |
¶ 杂项
| 名字 | 符号 | 代码 | 备注 |
|---|---|---|---|
| 自然连接 | \bowtie | latex如何输入自然连接 ⋈ | |
| 波浪线 | \sim |
latex 波浪线 ~ |
¶ 各种箭头
| 符号 | 代码 |
|---|---|
| \leftarrow | |
| \rightarrow | |
| \leftrightarrow | |
| \Leftarrow | |
| \Rightarrow | |
| \Leftrightarrow |
完整版:如何用LaTeX打出各种箭头?
¶ 符号上面的横杠等
| 样式 | 效果 | 代码 |
|---|---|---|
| 横杠 | \bar{a} | |
| 波浪线 | \tilde{a} | |
| 长波浪线 | \widetilde{aaa} | |
| 点 | \dot{a} | |
| hat | \hat{a} |
完整版:latex 字母上面加符号
¶ 等式
equation*中的*表示不要编号。
\begin{equation*}
    10 + \frac{20}{(1+y)^{\frac{5}{12}}} - \frac{20}{(1+y)^\frac{9}{12}} = 0
\end{equation*}
¶ 公式集
\usepackage{amsmath}\begin{gather*}
Co2Low1(lightIntensity, temperature) \\
Co2Low2(lightIntensity, temperature)
\end{gather*}¶ 大括号
开始:\left\符号,结束:\right\符号。
符号:花括号{和},方括号[和],小括号(和),或者没有符号.。
例子:左边是左花括号{,右边无符号.:
\left\{\begin{aligned}
f(x) &= -1, & x < 0 \\
f(x) &= 0, & x = 0 \\
f(x) &= 1, & x > 0
\end{aligned}\right.它的效果跟cases一样:
¶ 公式中插入中文
\text{中文}¶ 把下标放到正下方
¶ 使用underset
这种方法可用于任何符号
\underset{theta}{\bowtie}效果
感谢RMan大佬告知。
¶ 使用limits
参考:https://zhidao.baidu.com/question/873705252499505652.html
仅限于放到数学运算符下方
\sum\limits_{i=1}效果:
若是普通符号,那么要用
\mathop{\bowtie}\limits_{theta}效果:
¶ 插入图片
¶ 单张图片
参考:
https://zhidao.baidu.com/question/556236943.html
https://www.jianshu.com/p/5f342de813d9
\usepackage{graphicx}\begin{figure}
\center\includegraphics[width=\textwidth]{img/condition.png}
\caption{标题}
\end{figure}其中\center表示图片位置居中,width=\textwidth表示宽度与页面等宽,img/condition.png是图片文件的相对位置。
如果不想让图片乱动,可以加[H]选项
\begin{figure}[H]但是前面要
\usepackage{float}¶ 子图
subcaption
教程:https://latex-tutorial.com/subfigure-latex/
默认似乎是label和text都是粗体。如果不想这样可以显式让subcaption是正常字体:
\usepackage[labelfont=normalfont,textfont=normalfont]{subcaption}子图caption字号默认要小一号。如果要让字号跟正文一样,可以在包参数里加上font=normalsize:
\usepackage[font=normalsize,labelfont=normalfont,textfont=normalfont]{subcaption}让子图的caption偏移指定距离:
\captionsetup[subfigure]{oneside,margin={0.8cm,0cm}}
\begin{subfigure}{0.3\textwidth}
...来源:How to move the caption of a subfigure right?
(obsolete) subfigure
\usepackage{subfigure}\begin{figure}[H]
\begin{center}
\subfigure{
\includegraphics[width=0.98\textwidth]{img/国债1.png}
}
\subfigure{
\includegraphics[width=0.98\textwidth]{img/国债2.png}
}
\end{center}
\end{figure}
两张图片就被放在一起了。如果用单张图片的方式则会使得两张图片之间的间隔很大。
注:subfigure是obsolete package,已被subfig和subcaption替代:https://ctan.org/pkg/subfigure
参考:
https://blog.csdn.net/yq_forever/article/details/84796802
https://blog.csdn.net/mifangdebaise/article/details/95871208
https://latex-tutorial.com/subfigure-latex/
¶ 绕排
https://www.zhihu.com/question/26837705
wrapfigure指定行数
¶ 枚举
LaTex 解决Itemize和Enumerate的item之间行距过大的问题
¶ 编号
使用enumerate。可以自定义enumerate的编号样式。
自定义编号样式时要用到的包:
\usepackage{enumerate}它的使用非常直观。例如要实现这样的编号样式
1)
2)
就这样
\begin{enumerate}[1)]如果要
(a)
(b)
就
\begin{enumerate}[(a)]或者这样
1、
2、
3、\begin{enumerate}[1、]¶ 小圆点
\begin{itemize}
    \item aaaa \par
    bbb
    \item ccc \par
    \item ddddd
\end{itemize}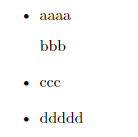
¶ 插入表格
¶ 基本表格
\begin{tabular}{|c|c|c|c|c|}
    \hline
    & A & B & C & D \\
    \hline
    $P_0$ & 0 & 1 & 0 & 0 \\
    \hline
    $P_1$ & 0 & 4 & 2 & 1 \\
    \hline
    $P_2$ & 1 & 0 & 0 & 1 \\
    \hline
    $P_3$ & 0 & 0 & 2 & 0 \\
    \hline
    $P_4$ & 0 & 6 & 4 & 2 \\
    \hline
\end{tabular}c: Centering,居中。另外两种对齐方式是l: Left, 左对齐,r: Right, 右对齐。|c|: 单元格两侧添加竖线。- hline: 水平线(Horizontal LINE)
效果

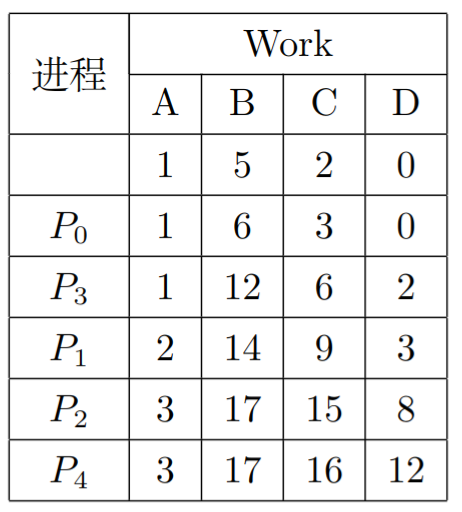
¶ 合并单元格
\usepackage{multirow}\begin{tabular}{|c|c|c|c|c|}
\hline
\multirow{2}*{进程} %纵向合并2行单元格
&
\multicolumn{4}{|c|}{Work} \\
\cline{2-5} %为2到5列添加横线
& A & B & C & D \\
\hline
& 1 & 5 & 2 & 0 \\
\hline
$P_0$ & 1 & 6 & 3 & 0 \\
\hline
$P_3$ & 1 & 12 & 6 & 2 \\
\hline
$P_1$ & 2 & 14 & 9 & 3 \\
\hline
$P_2$ & 3 & 17 & 15 & 8 \\
\hline
$P_4$ & 3 & 17 & 16 & 12 \\
\hline
\end{tabular}- cline: Column
LINE
¶ 居中
- 使用center环境
\begin{center}
    \begin{tabular}{|c|c|c|c|c|}
        ........
    \end{tabular}
\end{center}- 使用table环境,设置
\begin{table}
    \centering
    \begin{tabular}{|c|c|c|c|c|}
    	...........
    \end{tabular}
\end{table}如果不想让它乱跑可以用\begin{table}[H],但是要加上\usepackage{float}
¶ 设置标题
参考:https://blog.csdn.net/wkd22775/article/details/51791553
用\caption{标题}
¶ 放在表上方
\begin{table}
    \centering
    \caption{23333}
    \begin{tabular}{|c|c|c|}
        \hline
        A & B & C \\
        \hline
        D & 1 & 2 \\
        \hline
        E & 3 & 4 \\
        \hline
    \end{tabular}
\end{table}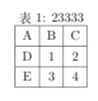
¶ 放到表下面
把\caption{标题}放到\end{table}前面
\begin{table}
    \centering
    \begin{tabular}{|c|c|c|}
        \hline
        A & B & C \\
        \hline
        D & 1 & 2 \\
        \hline
        E & 3 & 4 \\
        \hline
    \end{tabular}
    \caption{23333}
\end{table}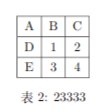
¶ 不自动给标题编号
参考:https://zhidao.baidu.com/question/616239100442857532.html
直接把标题作为表的一行就好了。
\begin{tabular}{|c|c|c|}
    \multicolumn{3}{c}{23333}\\
    \hline
    A & B & C \\
    \hline
    D & 1 & 2 \\
    \hline
    E & 3 & 4 \\
    \hline
\end{tabular}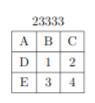
¶ 去掉左边的缩进
默认情况下,tabular左边可能会有缩进,如图
如果不想要这个缩进,将tabular包裹在一个table环境中即可。
	\begin{enumerate}
	\item 有缩进!\par
		\begin{tabular}{|c|c|c|}
			\multicolumn{3}{c}{23333}\\
			\hline
			A & B & C \\
			\hline
			D & 1 & 2 \\
			\hline
			E & 3 & 4 \\
			\hline
		\end{tabular}
	\item 没缩进了!\par
		\begin{table}[H]
		\begin{tabular}{|c|c|c|}
			\multicolumn{3}{c}{23333}\\
			\hline
			A & B & C \\
			\hline
			D & 1 & 2 \\
			\hline
			E & 3 & 4 \\
			\hline
		\end{tabular}
		\end{table}
	\end{enumerate}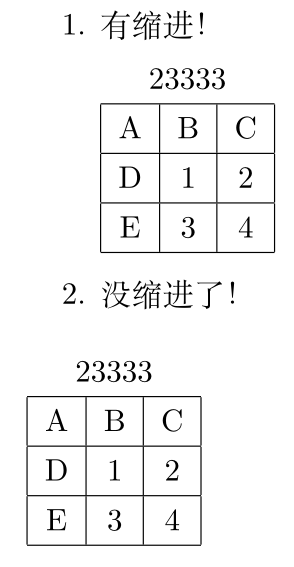
¶ 去掉单元格里面的边距
用@{},例如去掉左边的边距:\begin{tabular}{@{}lr},去掉右边的边距:\begin{tabular}{lr@{}},去掉两边的边距:\begin{tabular}{@{}lr@{}}。
也可以把@{}换成@{\hspace{1.4mm}}来指定边距。
来源:https://www.oomake.com/question/703820
¶ footnote
表格里直接用\footnote的话footnote并不会出现。需要使用tablefootnote:
\usepackage{tablefootnote}

\begin{table}[h!]
\begin{tabular}{|c|c|c|}
\hline
xxx\tablefootnote{Maximum allowed IOPS of gp3}
\end{tabular}
\end{table}
¶ 页面
¶ 去掉页码
在导言区加入:
\pagestyle{empty}如果只需要去掉前几页的页码:目录页和摘要页不设置页码
¶ 调整页边距
\usepackage{geometry}
\geometry{a4paper,left=3cm,right=3cm,top=3cm,bottom=3cm}
¶ 去掉段首缩进
\noindent
来源:latex段落取消缩进
¶ 字体符号
作为字体的符号,不需要在公式环境。
| 描述 | 代码 | usepackage |
|---|---|---|
| 锁 | \faLock |
fontawesome |
| 开锁 | \faUnlock |
fontawesome |
来源:https://tug.ctan.org/info/symbols/comprehensive/symbols-letter.pdf
¶ 各种下划线
¶ 直下划线
似乎如果里面有\这种东西就会报错Reconstruction failed,不过可以用~来替代。
¶ 波浪下划线
\usepackage[normalem]{ulem}
\uwave{text here}其中normalem是为了防止它把\emph变成下划线而不是斜体。来源:https://tex.stackexchange.com/a/396106/256676
但是似乎不能自动加hyphenation
-换行,会导致overfull的问题。
¶ 标签
用\label创建标签,用\ref引用标签
\begin{equation}\label{t1}
    10 - \frac{20}{(1+y)^{\frac{5}{12}}} = 0
\end{equation}

代入(\ref{t1})中,得也可以用\cref引用标签,会带上描述:
\usepackage[noabbrev, capitalize, nameinlink]{cleveref}\cref{fig:label}就会显示为Figure 1。
¶ 插入超链接
https://blog.csdn.net/qq_34809033/article/details/80734433
¶ 插入代码
\usepackage{listings}
\usepackage{xcolor}
\usepackage{fontspec}
\usepackage{inconsolata}
\fontspec{inconsolata}
\setmonofont[StylisticSet=1]{inconsolata} %1 or 3??? 让0中间有一个斜线,让l不像1。在\maketitle后面设定默认的代码样式。下面是适合黑白打印的设定:
	\lstset{ %
		backgroundcolor=\color{white},   % choose the background color; you must add \usepackage{color} or \usepackage{xcolor}
		basicstyle=\ttfamily,			 %ttfamily is consolas
		breakatwhitespace=false,         % sets if automatic breaks should only happen at whitespace
		breaklines=true,                 % sets automatic line breaking
		deletekeywords={...},            % if you want to delete keywords from the given language
		escapeinside={\%*}{*)},          % if you want to add LaTeX within your code
		extendedchars=true,              % lets you use non-ASCII characters; for 8-bits encodings only, does not work with UTF-8
		keepspaces=true,                 % keeps spaces in text, useful for keeping indentation of code (possibly needs columns=flexible)
		morekeywords={*,...},            % if you want to add more keywords to the set
		numbers=left,                    % where to put the line-numbers; possible values are (none, left, right)
		numbersep=5pt,                   % how far the line-numbers are from the code
		numberstyle=\ttfamily,
		rulecolor=\color{black},         % if not set, the frame-color may be changed on line-breaks within not-black text (e.g. comments (green here))
		showspaces=false,                % show spaces everywhere adding particular underscores; it overrides 'showstringspaces'
		showstringspaces=false,          % underline spaces within strings only
		showtabs=false,                  % show tabs within strings adding particular underscores
		stepnumber=1,                    % the step between two line-numbers. If it's 1, each line will be numbered
		tabsize=4,                       % sets default tabsize to 2 spaces
		columns=fullflexible,
    }
¶ 直接插入代码
\begin{lstlisting}[numbers=none]
mpirun -n 20 ./xhpl
\end{lstlisting}
注意代码块里的空格和tab都会如实显示出来。
¶ 从文本中读取代码
\lstinputlisting{hello.c}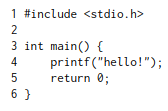
¶ 左引号
参考:https://blog.csdn.net/dyzok88/article/details/44222765
左单引号(键盘上1左边那个)`
左双引号(按两下键盘上1左边的按键)``
¶ 不加粗
\textnormal{xxx}来源:https://tex.stackexchange.com/a/225273
¶ 从多处引用footnote
Text with first footnote\footnote{\label{note1}This is the labeled footnote}
and more text with a second footnote\footnote{here}.

In this new paragraph we have a reference to the first
footnote\footnotemark[\ref{note1}].这个不行,\footnotemark[\ref{note1}]会报错。来源:https://tex.stackexchange.com/a/35044
但是这个可以:
\usepackage{footmisc}

Text with first footnote\footnote{\label{note1}This is the labeled footnote}
and more text with a second footnote\footnote{here}.

In this new paragraph we have a reference to the first
footnote\footref{note1}.来源:https://tex.stackexchange.com/a/74668
footmisc和scrextend都提供footref,但是\usepackage{scrextend}会报错Command \@subtitlefont already defined.。所以这里用footmisc。
¶ 圆圈编号
原文:https://tex.stackexchange.com/a/8473/256676
\textcircled
原文:https://tex.stackexchange.com/a/8553/256676
\textcircled{\small{1}}
\textcircled{\small{2}}
\textcircled{\small{3}}
\textcircled{\small{4}}
\textcircled{\small{5}}
\textcircled{\small{6}}
\textcircled{\small{7}}
\textcircled{\small{8}}
\textcircled{\small{9}}
\textcircled{\small{10}}
\textcircled{\small{11}}
\textcircled{\small{22}}
\textcircled{\small{33}}
\textcircled{\small{44}}
\textcircled{\small{55}}
\textcircled{\small{66}}
\textcircled{\small{77}}
\textcircled{\small{88}}
\textcircled{\small{99}}
fg
¶ tikz
基于Ch'en
Meng的回答,把sep改成了0.5pt,参数外面套了一层\small,从而变得更紧凑:
\usepackage{tikz}
\newcommand{\smallcircled}[2][]{%
\tikz[baseline=(char.base)]{%
\node[shape = circle, draw, inner sep = 0.5pt]
(char) {\phantom{\ifblank{#1}{\small{#2}}{\small{#1}}}};%
\node at (char.center) {\makebox[0pt][c]{\small{#2}}};}}
\robustify{\smallcircled}
```
因为reputation不够所以没有把这个贴上去。
测试代码:
```tex
% 10是占位符,让所有圆圈大小一样。
\smallcircled[10]{1}
\smallcircled[10]{2}
\smallcircled[10]{3}
\smallcircled[10]{4}
\smallcircled[10]{5}
\smallcircled[10]{6}
\smallcircled[10]{7}
\smallcircled[10]{8}
\smallcircled[10]{9}
\smallcircled[10]{10}
\smallcircled[10]{11}
\smallcircled[10]{22}
\smallcircled[10]{33}
\smallcircled[10]{44}
\smallcircled[10]{55}
\smallcircled[10]{66}
\smallcircled[10]{77}
\smallcircled[10]{88}
\smallcircled[10]{99}
fg
```
效果:

### `\ding`
```tex
\usepackage{pifont}
% 1到10空心圆圈
\ding{172}--\ding{181}
```
缺点是只有1到10。
## 一行放多个独立的Figure或Table
用minipage:
```tex
\begin{figure*}[t!]
\begin{minipage}[b]{.475\linewidth}
\centering
\includegraphics[width=\textwidth]{example-image}
\vspace{-0.3cm}
\caption{XXX}
\end{minipage}
\hfill
\begin{minipage}[b]{.475\linewidth}
\centering
\includegraphics[width=\textwidth]{example-image}
\vspace{-0.3cm}
\caption{XXX}
\end{minipage}
\end{figure*}
```
这个不管用:
相关:
## 指定fontsize
`\fontsize{size}{skip}\selectfont This is pt text`
例子:
```text
\fontsize{12}{14}\selectfont This is 12pt text.
```
一般来说`skip`设置为大约`1.2 * size`:
来源:
## Bibliography
### URL
Bibliography里URL不要用`url = {https://xxx}`的形式,要用`note = {\url{https://xxx}}`的形式,因为有些论文模板不认前者。
让URL自动换行:
```tex
% https://tex.stackexchange.com/questions/3033/forcing-linebreaks-in-url
\PassOptionsToPackage{hyphens}{url}\usepackage{hyperref}
\def\UrlBreaks{%
\do\/%
\do\a\do\b\do\c\do\d\do\e\do\f\do\g\do\h\do\i\do\j\do\k\do\l%
\do\m\do\n\do\o\do\p\do\q\do\r\do\s\do\t\do\u\do\v\do\w\do\x\do\y\do\z%
\do\A\do\B\do\C\do\D\do\E\do\F\do\G\do\H\do\I\do\J\do\K\do\L%
\do\M\do\N\do\O\do\P\do\Q\do\R\do\S\do\T\do\U\do\V\do\W\do\X\do\Y\do\Z%
\do0\do1\do2\do3\do4\do5\do6\do7\do8\do9\do=\do/\do.\do:%
\do\*\do\-\do\~\do\'\do\"\do\-}
\Urlmuskip=0mu plus 0.1mu
```
让URL使用跟正文一样的字体:
```tex
\renewcommand{\UrlFont}{\normalfont}
```
### 不cite也列出参考文献
`\nocite{xxx}`来强制列出单个参考文献。`\nocite{*}`强制列出所有参考文献。
来源:
## 指定字体
### Linux Libertine
```tex
% https://www.tug.org/FontCatalogue/linuxlibertine/
\usepackage{libertine}
\usepackage{libertinust1math}
\usepackage[T1]{fontenc}
```
### 去掉标题
```tex
\usepackage{etoolbox}
\patchcmd{\thebibliography}{\section*{\refname}}{}{}{}
```
来源:
## 定理和证明
```tex
\usepackage{amsthm}
\newtheorem{theorem}{Theorem}
```
```tex
\begin{theorem}
定理内容。会变成斜体字。
\end{theorem}
\begin{proof}
证明。
\end{proof}
```
参考:
## algorithm2e
- {% post_link Latex/'algorithm2e包参数' %}
- {% post_link Latex/'algorithm2e无限循环' %}
```tex
\usepackage[linesnumbered, ruled, vlined]{algorithm2e}
\begin{algorithm}
\caption{xxx}\label{alg:xxx}
\DontPrintSemicolon
\SetKw{Continue}{continue}
\SetKw{And}{and}
\SetKw{True}{true}
\For{xxx}{
\textcolor{gray}{// 注释} \;
\If {条件1 \And 条件2} {
\Continue \;
}
% https://tex.stackexchange.com/a/281240
\uIf {条件} {
xxx \;
} \uElseIf {条件} {
xxx \;
} \Else {
xxx \;
}
}
\While{条件}{
\eIf {条件} {
xxx \;
} {
xxx \;
}
}
\Return \True \;
\end{algorithm}¶ 其他
\ \par可以避免换行时underfull warning
取消section前编号: \section*{...}
¶ 异常处理
textbf{}加粗对英文无效
\usepackage[T1]{fontenc}
来源:latex 字体加粗失效
相关:https://tex.stackexchange.com/questions/664/why-should-i-use-usepackaget1fontenc